Winter driving abroad is a route-and-vehicle decision, not a country list. A trip can cross a dry valley, a signposted chain zone and an avalanche closure in the same day. Tyre markings, chain clearance, rental insurance, daylight and road notices all matter. Build the evidence file before booking and keep a lower route for a changed forecast.
Use the winter-driving destination pages for local examples, the car-rental insurance guide for towing and excess questions and the breakdown guide for incident evidence. Use the official sources for the final decision.
Define the winter route and legal trigger
Separate dates, conditions and signs
Winter equipment can be required by a calendar, weather, region or sign. Your Europe warns that EU countries do not use one set of road-safety rules. France’s official mountain-zone notice, for example, uses signed areas and a winter period from 1 November to 31 March, with a choice between qualifying tyres and removable devices. Do not copy a date from a neighbouring country.
| Route question | Evidence to record |
|---|---|
| Where | Country, province, mountain department, pass and road operator |
| When | Travel date, forecast window and any seasonal period |
| What | Vehicle class, driven axle, tyre mark, chain or snow-sock option |
| What if | Closure notice, lower route, staffed stop and return time |
Read the sign at the boundary
A chain symbol, a 3PMSF tyre reference, a temporary limit or a closed-road barrier changes the plan at that point. Stop in a safe lay-by before opening the contract or fitting equipment. Photograph the sign, record the time and check the authority’s page. A navigation route across a red barrier is not a fallback.
 A winter road can change faster than a generic country table suggests. Photo by Matros via Wikimedia Commons, CC BY-SA 3.0.

Match the tyre marking to the route
Check the sidewall, axle and load
At pickup, photograph all four tyre sidewalls and read the approval mark, size, speed rating and direction arrow. Match the load and cold pressure to the vehicle manual. The UK Highway Code says tyre pressure must follow the manufacturer’s specification for the carried load; NHTSA also notes that cold weather lowers inflation pressure. M+S, 3PMSF, studded and all-season labels do not have one universal legal meaning.
Ask what the contract actually promises
Ask the branch whether the vehicle has four matching winter tyres, whether the spare or repair kit is compatible, and whether the insurance permits the planned pass. A booking filter saying “winterised” may refer to a fluid or an equipment package. Get the tyre mark, chain availability and roadside territory in writing. If the car cannot meet the route rule, change the vehicle or route before leaving.
Carry and practise the right chains
Check driven wheels and clearance
Chains or textile socks must fit the exact tyre size and the vehicle’s clearance. Confirm which axle is driven, whether the manual allows chains, and whether electronic or four-wheel-drive systems have a special instruction. A chain touching a brake line, suspension arm or wheel arch can cause damage. Keep gloves, a headlamp and a mat in the cabin for installation.
Practise before the pass
The Oregon Department of Transportation image below captures the useful habit: install chains in fair weather so the movement is familiar. Practise on a level surface, then remove and repack them. When a sign requires chains, stop before the gradient, use the fitting area and drive slowly enough for the chain to settle. Remove them when allowed; bare tarmac can damage tyres and roads.
 Practise fitting chains before the weather turns. Photo by Oregon Department of Transportation via Wikimedia Commons, CC BY 2.0.

Prepare the winter rental handover
Inspect visibility, controls and fluids
Clear snow and ice from every window, lamp, mirror, roof and sensor before moving. Confirm winter-grade washer fluid, working wipers, defroster, lights, battery warning, coolant and the emergency triangle or vest. Check the tyre tread and pressure when cold, and photograph the odometer and existing damage. The rental agreement should name roadside assistance and the territory it covers.
Keep the emergency kit reachable
Put the scraper, brush, warm layer, gloves, water, food, charger, torch, first-aid kit, warning device and small shovel where they can be reached from the cabin. A vest in a locked boot is awkward if traffic stops on a dark shoulder. Keep the rental number, road authority and emergency number offline. Do not rely on a hotel or fuel station being open during a storm.
Drive with lower grip and longer stops
Use smooth controls and a larger gap
NHTSA advises slowing down and increasing following distance on snow, sleet and ice. Use gentle steering, braking and acceleration; avoid a sudden lane change; and let the vehicle’s ABS work with firm, continuous pedal pressure. A non-ABS vehicle needs the procedure in its manual. Select a lower gear before a descent and avoid riding the brakes until they fade.
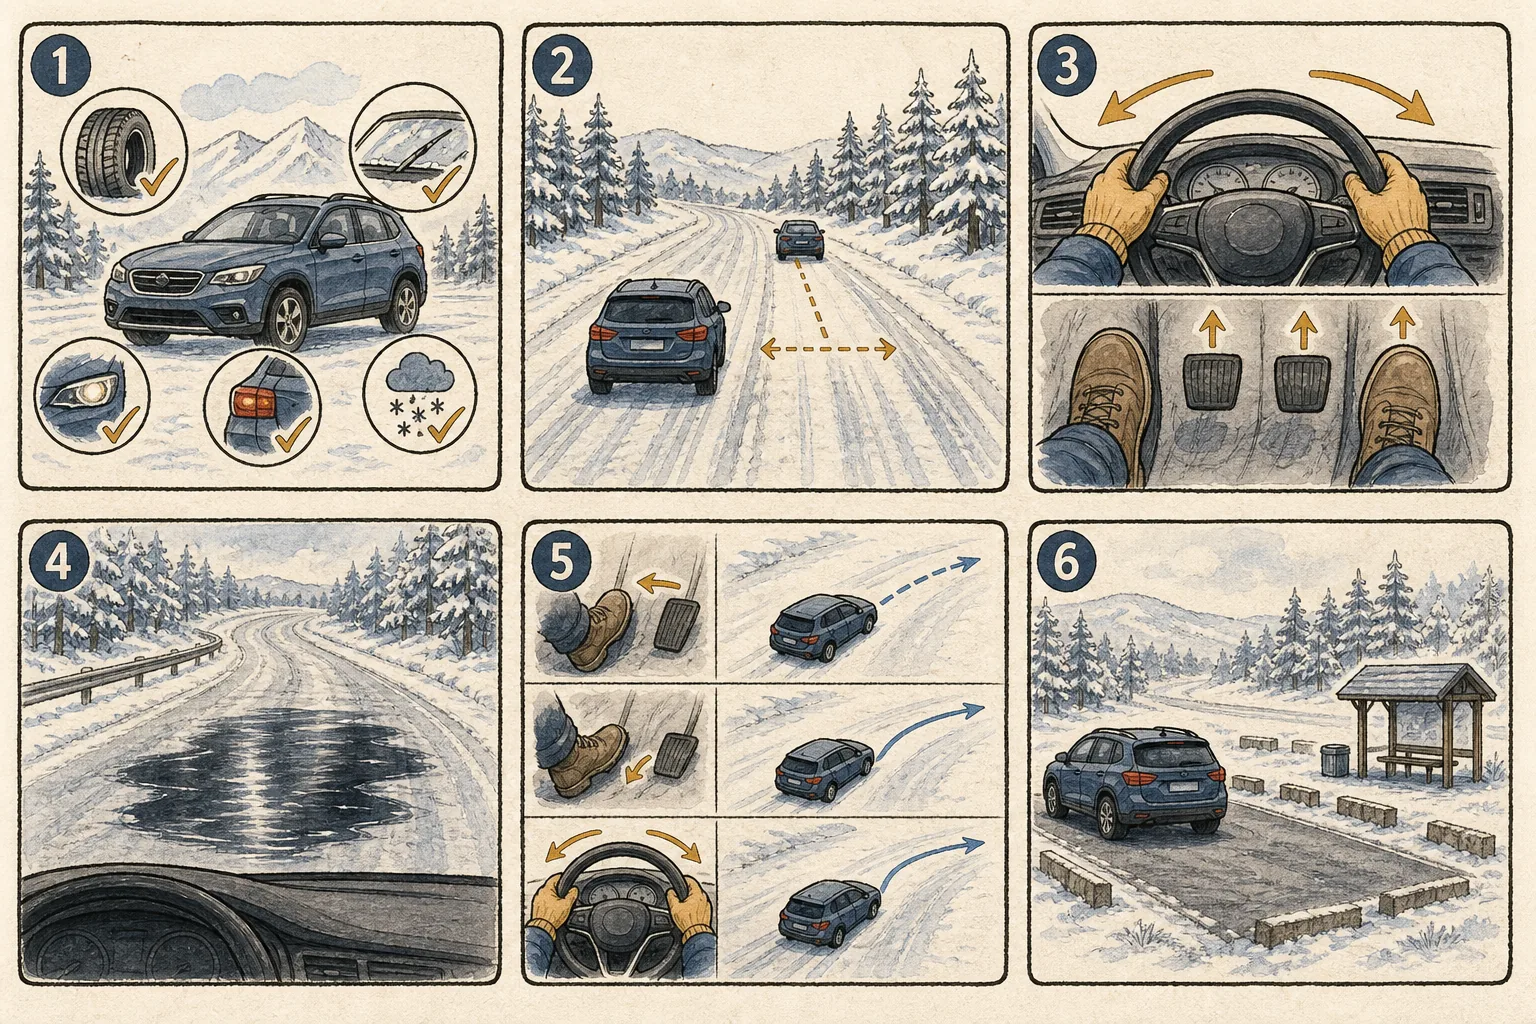
Winter sequence: check the car and forecast, leave more room, use smooth controls, watch for black ice, ease off if grip falls, and stop only where it is safe. Click to enlarge.
Do not let cruise control choose the speed
On a slippery or changing surface, keep direct control of the throttle. Avoid cruise control when the road is wet, snowy or icy, and reduce speed before a bend rather than braking while turning. If visibility falls, pull into a safe signed area or staffed stop. Never stop in a live lane simply to read a forecast.
Recognise black ice and visibility loss
Treat a wet-looking road as a warning
Black ice can look like ordinary wet asphalt. It forms readily on bridges, overpasses, shaded bends, tunnel mouths and at dawn after meltwater refreezes. The U.S. National Weather Service says bridges can freeze before the surrounding road and advises stopping when visibility becomes unsafe. Keep the steering straight, ease off the accelerator and avoid a hard brake if grip suddenly disappears.
 Black ice can look wet while carrying very little grip. Photo by Oregon Department of Transportation via Wikimedia Commons, CC BY 2.0.
.jpg)
Make a stop decision early
Heavy snow, freezing rain, a snowplough convoy, avalanche warning, repeated wheel spin or a driver who cannot see lane edges is a reason to stop or turn back. Do not follow a closed-pass detour into an unassessed road. Tell the accommodation or group contact where you are, then wait for a road authority update or a safe recovery.
Check closures and recovery territory
Use the road operator on departure day
Save the pass, tunnel, ferry and avalanche authority for each stage. Check the live closure map and forecast in the morning, then again before the climb. A tunnel may stay open when a pass closes, yet have a toll, height limit, queue or a different chain rule. Ask the rental company whether towing covers a closed or inaccessible road; optional protection may exclude it.
Keep the return route viable
Winter weather can delay a vehicle return, ferry or border. Build a spare day, a staffed overnight stop and enough fuel or charge for a queue. If the road is closed, keep the car visible, follow the authority’s instructions and do not bypass barriers. The destination’s emergency number and the rental’s assistance number solve different problems, so save both.
Winter departure worksheet
- ☐ Every country, region, pass, tunnel and road operator is listed.
- ☐ Seasonal dates, condition triggers and signed equipment zones are verified from official pages.
- ☐ Tyre sidewalls, 3PMSF or other marks, size, pressure and load rating match the vehicle manual.
- ☐ Chains or socks fit the exact driven wheels, clearance and contract, and have been practised.
- ☐ Washer fluid, wipers, defroster, lights, battery, coolant, spare or repair kit are checked.
- ☐ The rental contract states cross-border permission, winter equipment and roadside territory.
- ☐ Forecast, road surface, closure, avalanche and visibility checks are saved for each stage.
- ☐ The cabin kit includes warm layers, food, water, charger, torch, first aid, scraper and warning gear.
- ☐ A lower route, staffed stop, spare day and return plan exist for a closure or delay.
- ☐ Emergency, road authority, rental and insurer contacts are offline before the climb.
Sources and review date
This guide was reviewed on August 17, 2026. Tyre markings, chain equivalence, equipment periods, pass closures, weather warnings, rental cover and emergency procedures can change. Recheck the authority and rental branch when the route, vehicle or travel date changes.
- Your Europe: road rules and safety
- Your Europe: hiring and driving a car in another EU country
- GOV.UK Highway Code: vehicle maintenance and winter preparation
- NHTSA: winter weather driving tips
- France Service-Public: winter tyres or chains in mountain zones
- U.S. National Weather Service: what to do during a winter storm